Quagga and GNS3
Introduction
I’ve been meaning to play with Quagga for sometime. One of the administrators of the Quagga Project is an old friend of mine - I’ve had many debates with him over IRC, Facebook and Twitter over the years. Yet despite my interest in the networking field, I’ve not spent any time actually working with Quagga.
This tutorial presupposes some basic knowledge of Cisco networking, Linux, GNS3, and Virtualbox. This means that in order to follow this tutorial you will need the following on your machine. By the end of the tutorial you will have configured OSPF and BGP (IPv4 only) and established full connectivity between three hosts.
- GNS3. Additionally, you will need a Cisco IOS image to use with GNS3 for the Cisco elements.
- VirtualBox.
- An Ubuntu Server base install. For this example, I’m using Ubuntu 16.04.1 LTS.
Versions
- 18th Feb 2017 - First draft published online.
Create the Quagga Server
I have a very basic (and by basic I mean default install, no services at all) Ubuntu installation in my VirtualBox environment. I use this to help clone Ubuntu setups. This VirtualBox VM is setup so by default it has access to the internet through the single network interface. The first step is to clone this server in VirtualBox - copying the images. This is done by selecting the Ubuntu Base image, right clicking on the entry and selecting clone.
On the first page you need to define the name of the VirtualBox server (this is important, so hold onto that information
for later):
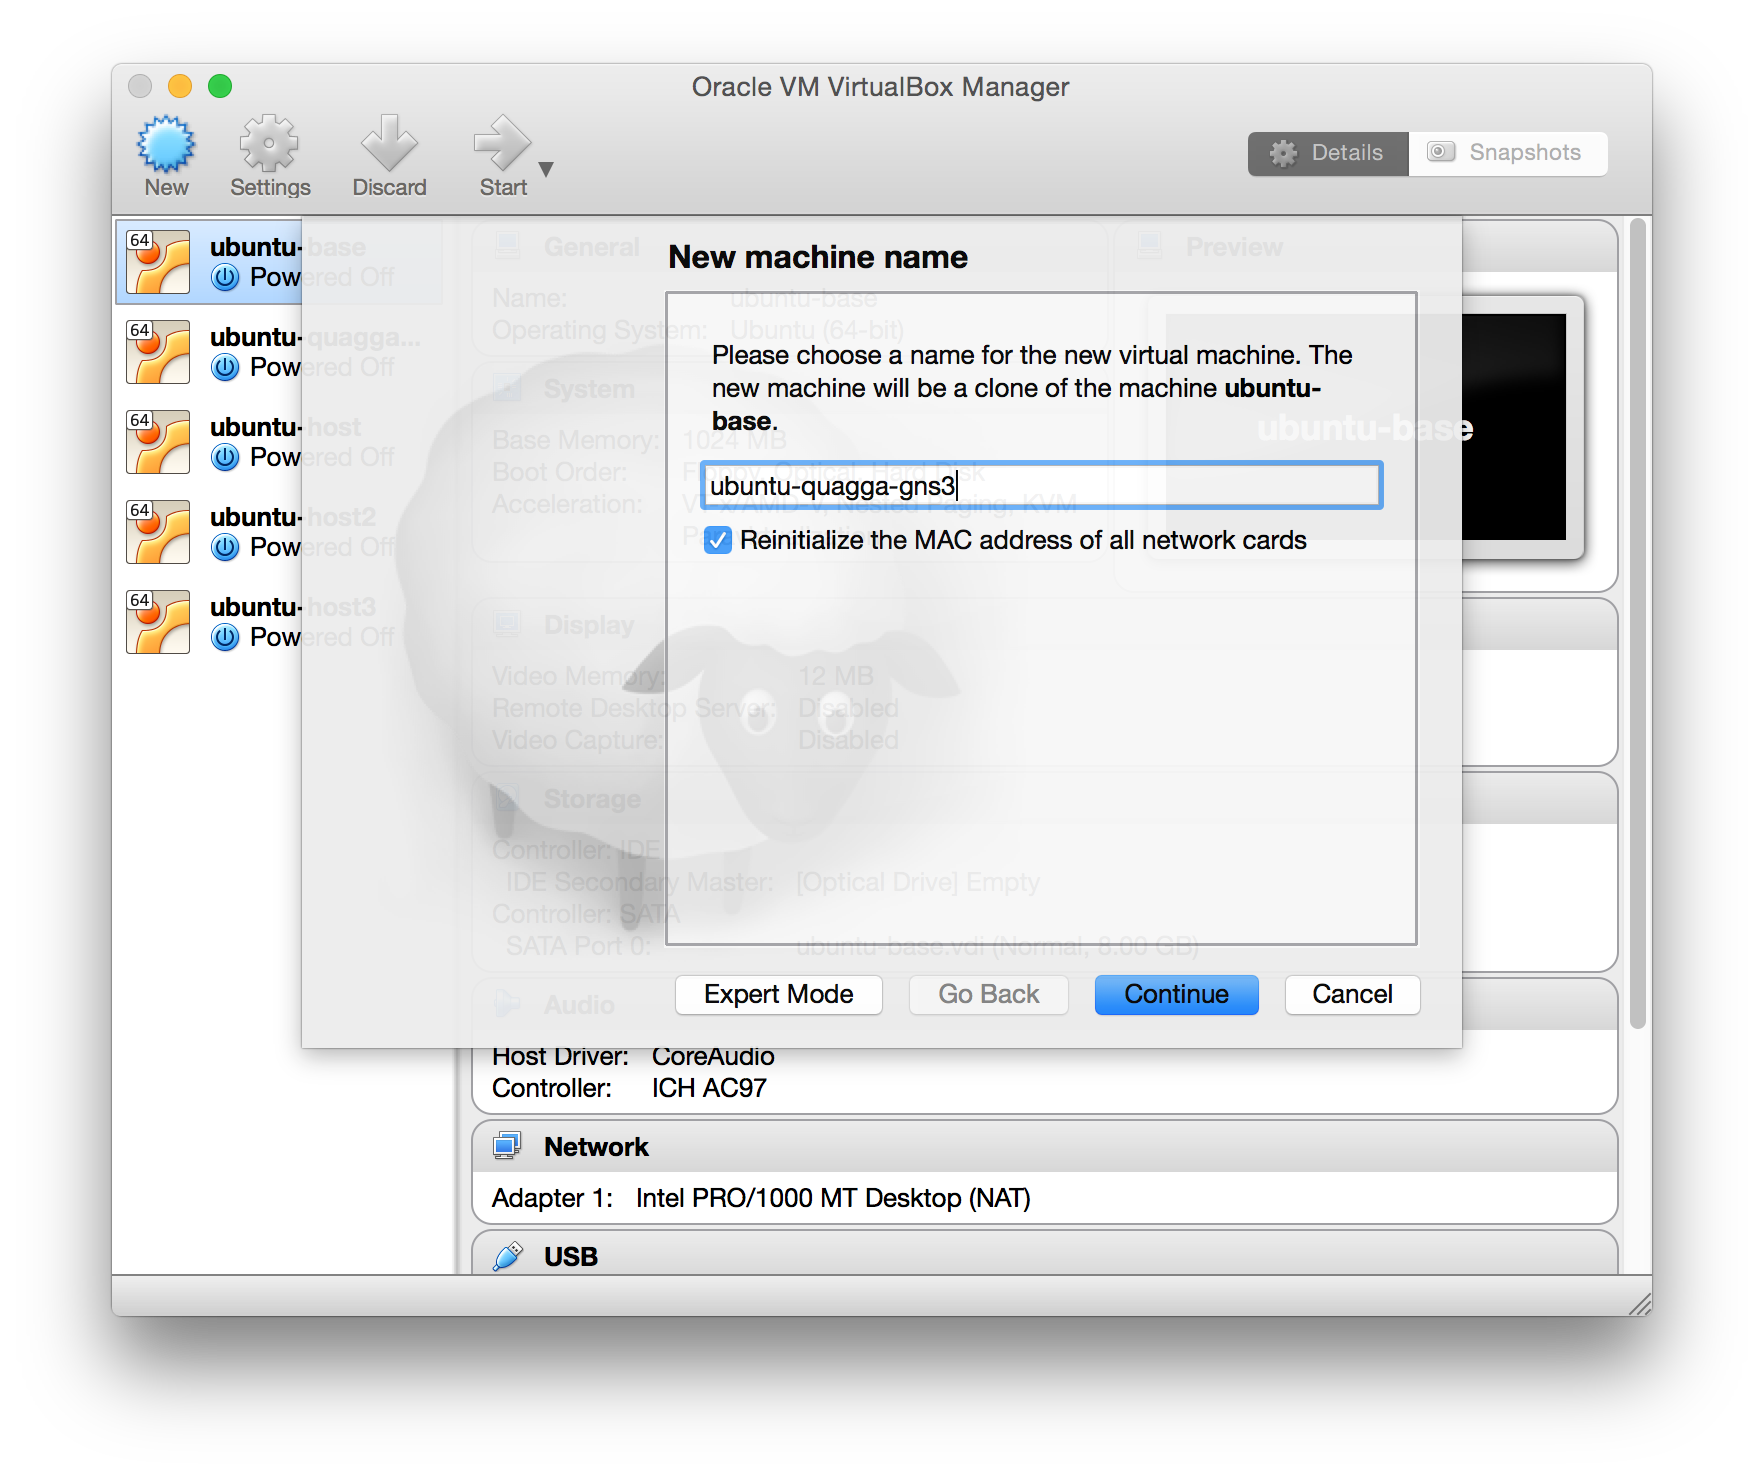
I typically go for Full Clone, but you can go for Linked Clone if you know what you’re doing:

Once that’s complete, boot up the VM. Log into the VM and then run the command
sudo apt-get install quagga
And you now have Quagga installed on the machine.
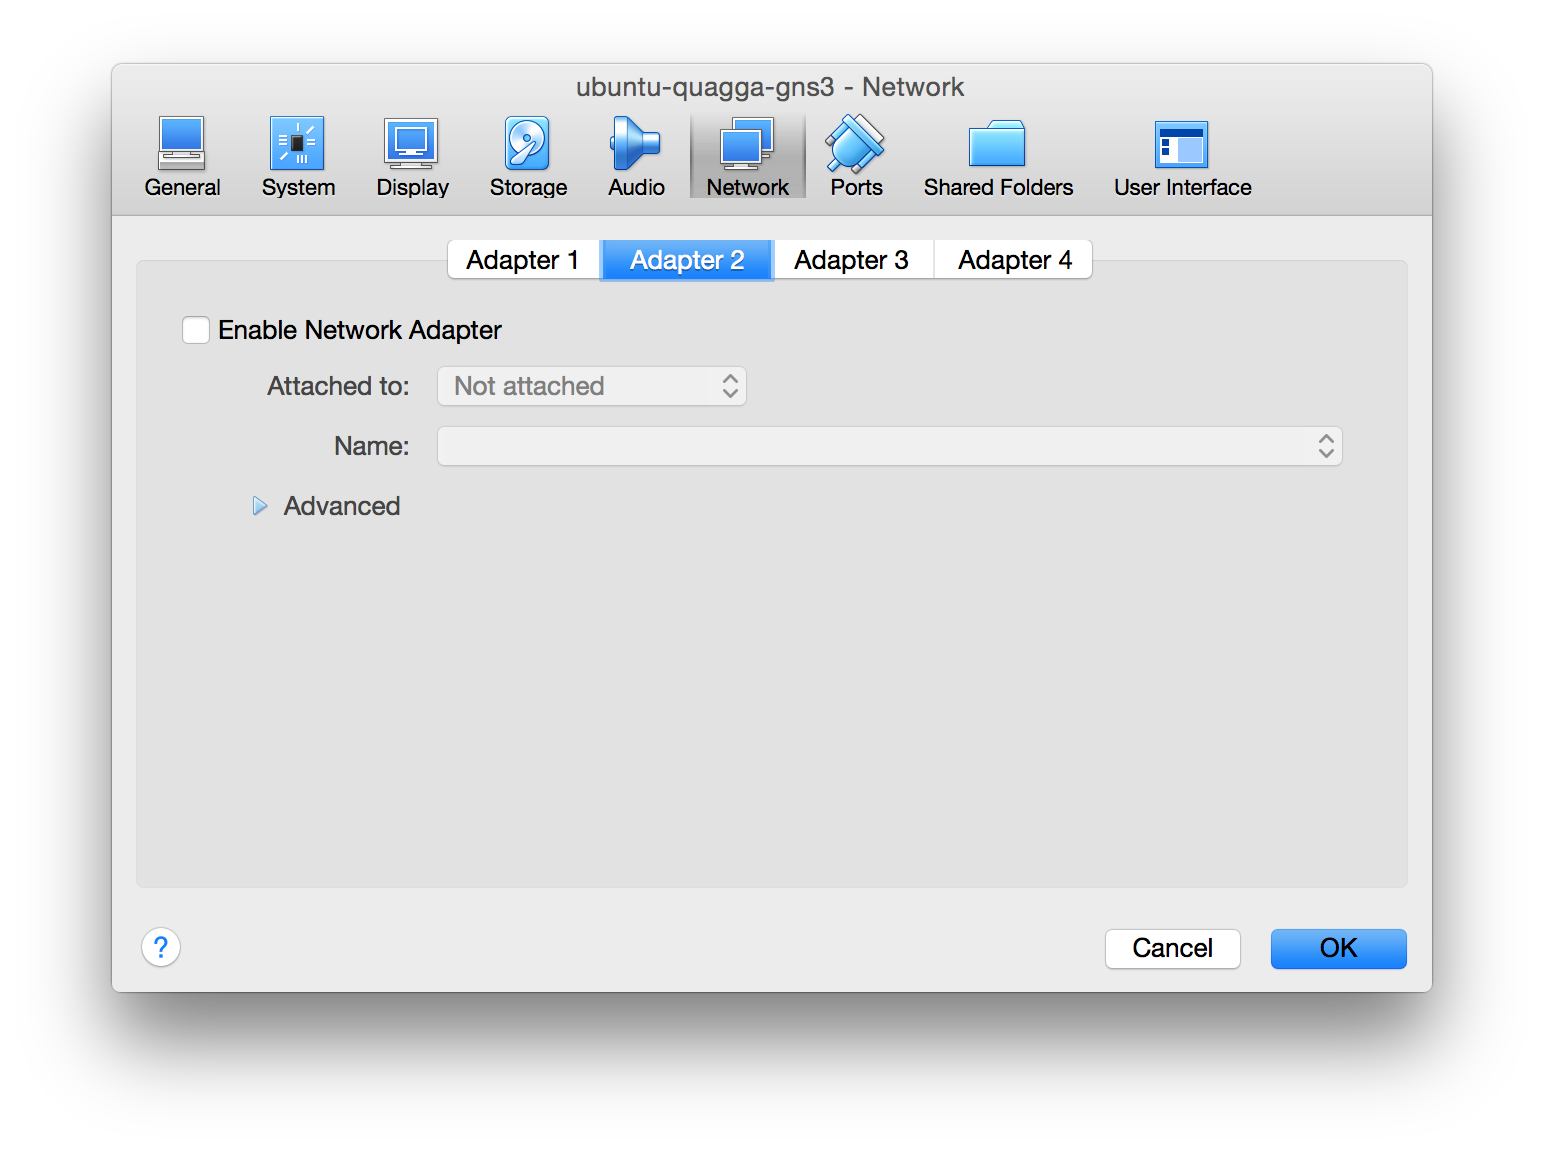
The next step is to halt the quagga server, and then change the network configuration. If you right click on the server, select Settings and go to Network you will see that Adapter1 is enabled, and attached to NAT. If you select Adapter2 you will see it’s not attached to anything.
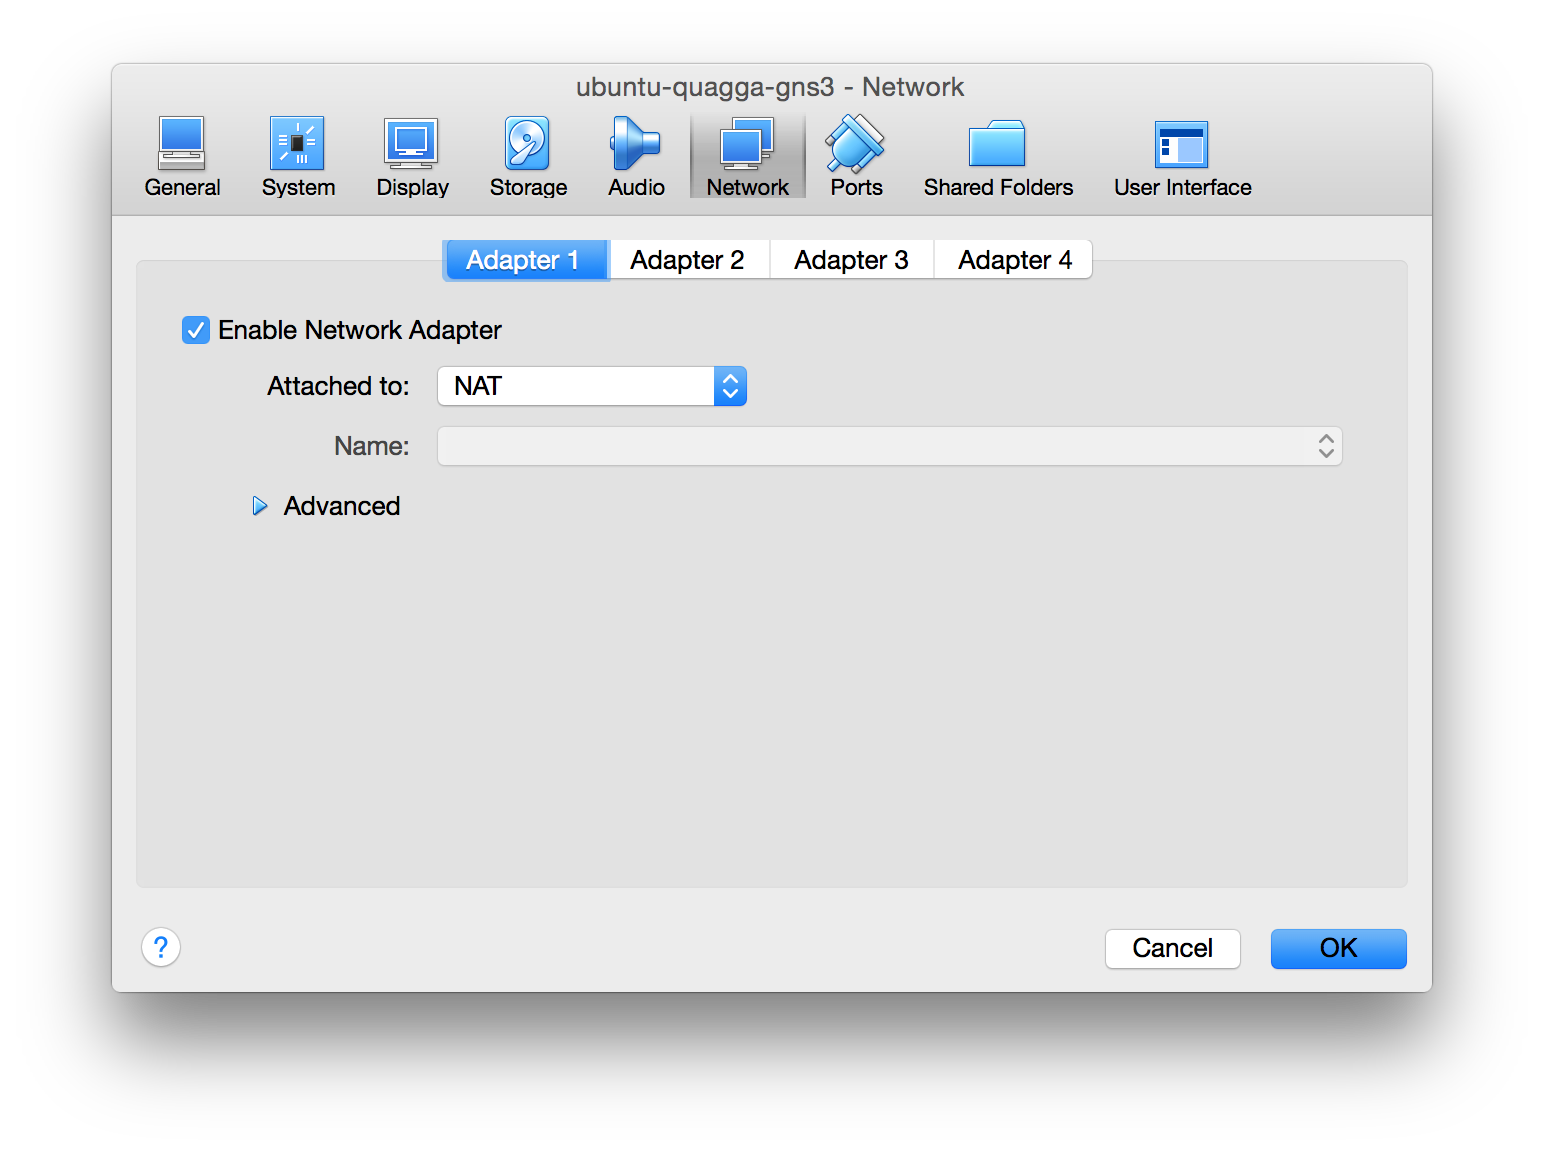
Before we move on, we need to detach the first adapter as by unchecking the Enable Network Adapter box (Alternatively, you can set this to Generic Driver if you want, but GNS3 will do that for you anyway in the next stage).
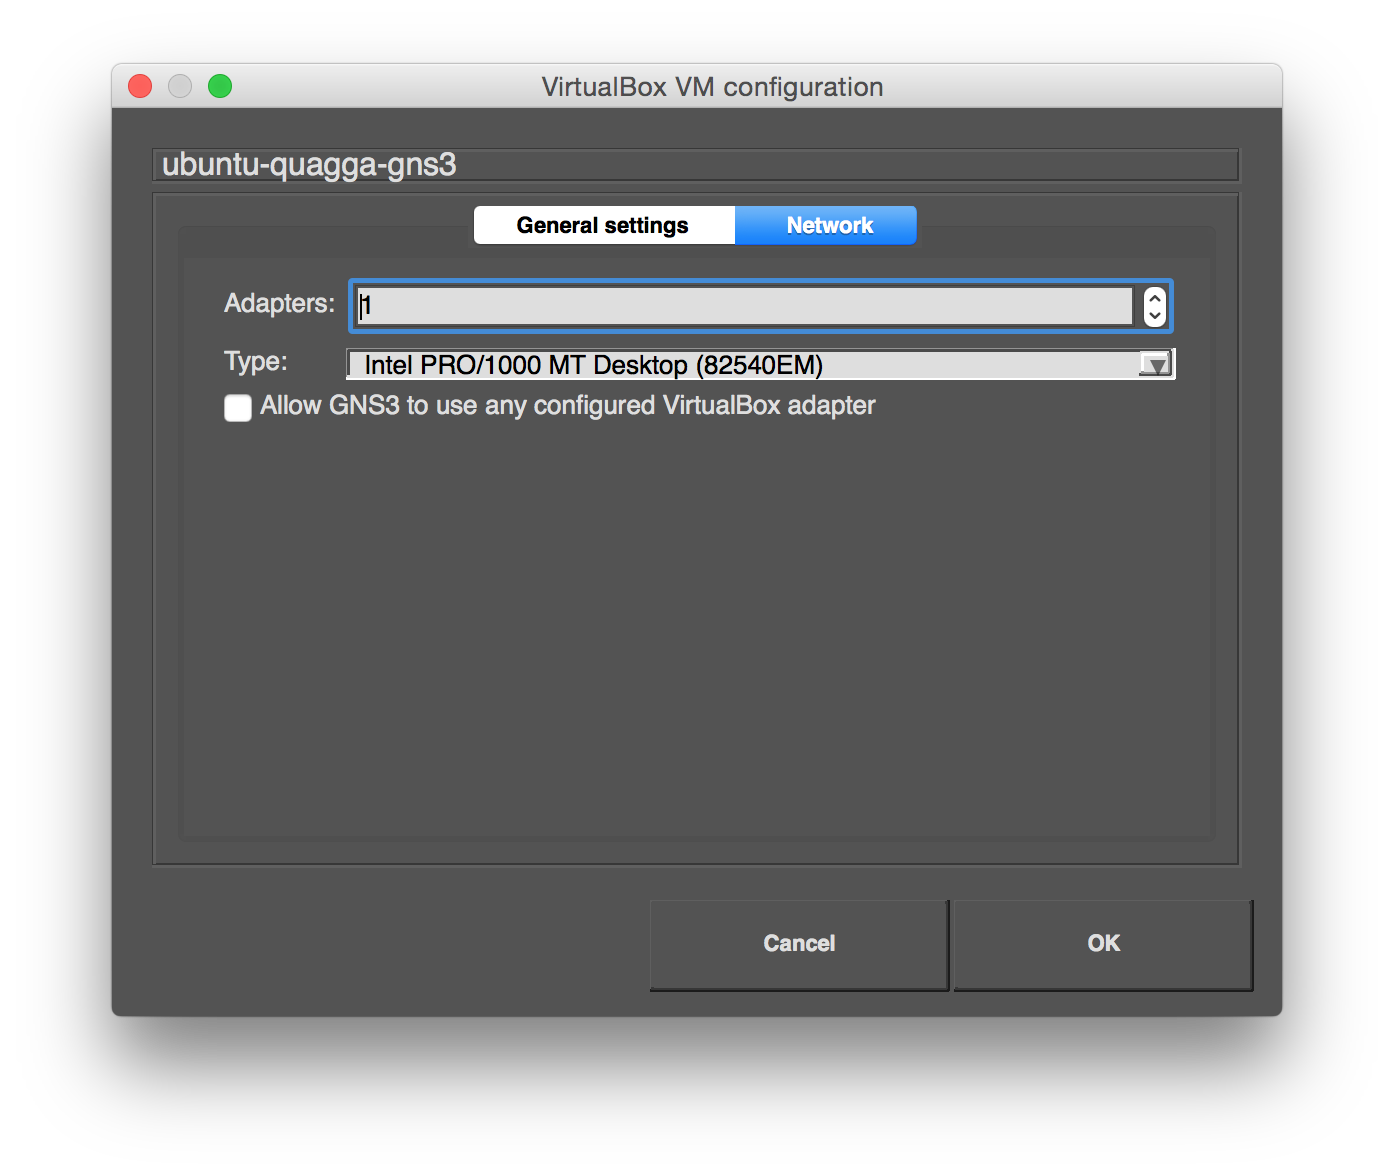
Finally, we need to add the server to GNS3. In GNS3, go GNS3->Preferences->VirtualBox VMs and select New. A Dropdown list of all the VMs in Virtualbox will be shown and you can select the instance you’ve installed Quagga on.
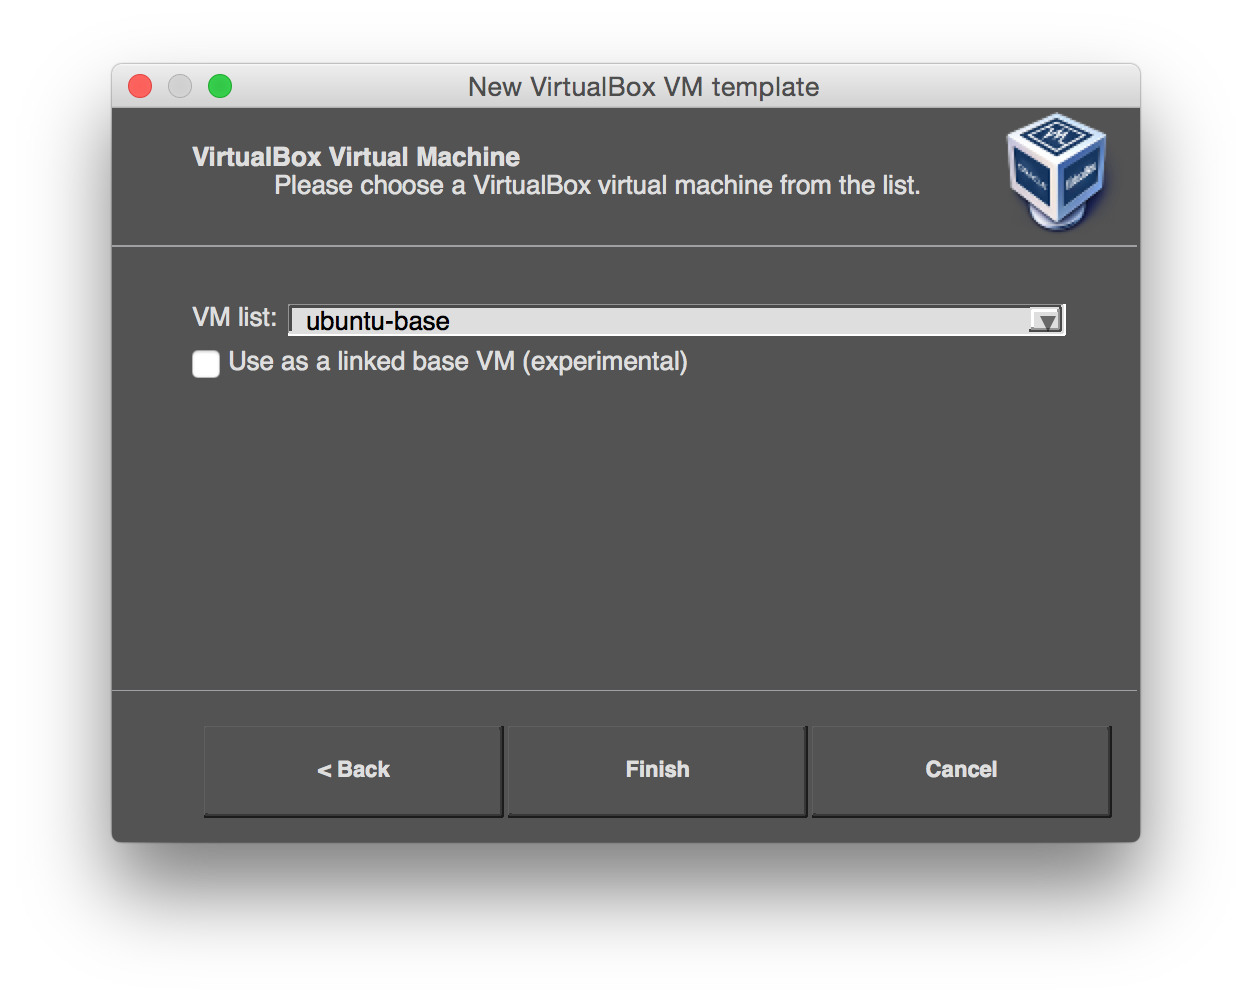
However, this typically adds the VM with a single interface - you need multiple interfaces for the lab set so select the VM, then click Edit and on the Network screen, increase the number of Adapters to 4.
GNS3 Topology / IP Allocation.
Before we go on, the next step is to layout the topology for this lab. As we’re trying to cover both OSPF and BGP, we will
set up three Cisco routers as well as the Quagga router:
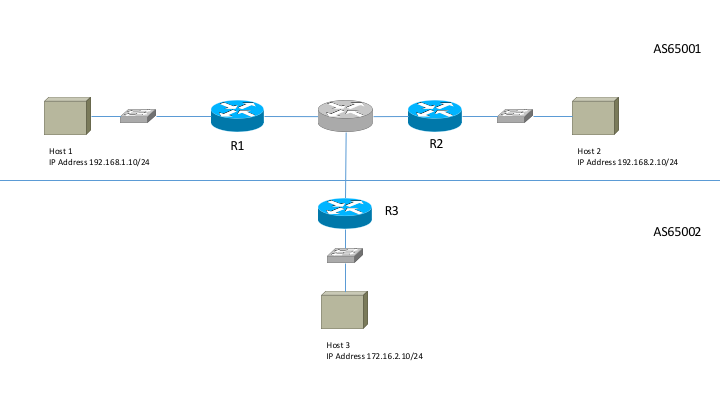
In the diagram above, the Quagga router is the Grey router. R1, R2 and R3 are all Cisco routers.
IP Allocations are as follows:
| Subnet | Hosts |
|---|---|
| 192.168.1.0/24 | Host 1 to R1 |
| 192.168.2.0/24 | Host 2 to R2 |
| 192.168.3.0/25 | Used for Loopbacks on R1 and R2 |
| 192.168.3.128/30 | R1 to Quagga router |
| 192.168.3.132/30 | R2 to Quagga router |
| 172.16.1.0/24 | BGP Peering LAN between Quagga and R3 |
| 172.16.2.0/24 | Host 3 to R3 |
| 172.16.3.3/32 | Loopback on R3 |
R1, R2 and Quagga are all in AS65001 and will use OSPF for dynamic routing accross the PtP links. The routes in AS65001 can all be summarised under 192.168.0.0/22 and this summary route will be used in BGP peering between Quagga and R3. The routes with AS65002 will be advertised to the Quagga router, which will then redistribute those routes into the IGP to deliver full connectivity.
We won’t go into details on how to setup the Ubuntu Hosts and I’m simply supplying the Cisco Router configurations (R1, R2, and R3)
Within GNS3, I set things up so that Ethernet1 on the Quagga device connects to R1, Ethernet2 to R2 and Ethernet3 to R3. Note though that as Ubuntu 16 uses systemd, the interfaces aren’t eth1, eth2 and eth3.
Configuring Quagga
Quagga is not a single server on a Linux box, but actually consists of several seperate daemons, each running a particular routing protocol. By default, none of the daemons are configured to run so the first thing we need to do is turn on the specific daemons we require. Using your preferred editor of choice (vim, emacs, pico) edit /etc/quagga/daemons to read as follows
zebra=yes
bgpd=yes
ospfd=yes
ospf6d=no
ripd=no
ripngd=no
isisd=no
babeld=no
Then change into /etc/quagga and do the following:
sudo touch zebra.conf bgpd.conf ospfd.conf
sudo chown quagga.quaggavty zebra.conf bgpd.conf ospfd.conf
Then restart the quagga service
sudo /etc/init.d/quagga restart
Finally, you need to enable ip forwarding in the Linux kernel:
sysctl -w net.ipv4.ip_forward=1
If this has all been done correctly, it should then be possible to connect and manage the quagga instances using vtysh.
This moves you from the UNIX command line into a more Cisco IOS style of environment. However, there is one last niggle.
For some reason, the vtysh interface defaults to using less as its pager of choice. You will find it annoying hitting q all
the time so I suggest changing the pager to use more. You can do this from the command line by executing the following:
VTYSH_PAGER=more;export VTYSH_PAGER
Then enter the quagga configuration mode - you may need to run this as sudo.
vtysh
This environment is a little like Cisco, but not completely. Entering configuration mode is done in the same way you would on a Cisco device
OSPF Configuration
interface enp0s8
 description ethernet1
 ip address 192.168.3.130/30
!
interface enp0s9
 description ethernet2
 ip address 192.168.3.134/30
!
router ospf
 network 192.168.0.0/22 area 0.0.0.0
The use of enp0s8 and enp0s9 is a feature of systemd and the fact we’re using Ubuntu 16 - if you’re using an earlier version, the interface names will be different. You can then save the configuration in a similar way to a Cisco IOS device:
ubuntu# wr
Building Configuration...
Configuration saved to /etc/quagga/zebra.conf
Configuration saved to /etc/quagga/ospfd.conf
Configuration saved to /etc/quagga/bgpd.conf
[OK]
You can now verify OSPF adjacencies are up in the vtysh environment:
ubuntu# sh ip ospf neighbor

    Neighbor ID Pri State           Dead Time Address         Interface            RXmtL RqstL DBsmL
192.168.3.1       1 Full/DR           30.647s 192.168.3.129   enp0s8:192.168.3.130     0     0     0
192.168.3.2       1 Full/DR           37.764s 192.168.3.133   enp0s9:192.168.3.134     0     0     0
ubuntu# show ip route
Codes: K - kernel route, C - connected, S - static, R - RIP,
       O - OSPF, I - IS-IS, B - BGP, P - PIM, A - Babel,
       > - selected route, * - FIB route

C>* 127.0.0.0/8 is directly connected, lo
O>* 192.168.1.0/24 [110/11] via 192.168.3.129, enp0s8, 00:08:17
O>* 192.168.2.0/24 [110/11] via 192.168.3.133, enp0s9, 00:08:21
O>* 192.168.3.1/32 [110/11] via 192.168.3.129, enp0s8, 00:08:17
O>* 192.168.3.2/32 [110/11] via 192.168.3.133, enp0s9, 00:08:21
O   192.168.3.128/30 [110/10] is directly connected, enp0s8, 00:08:21
C>* 192.168.3.128/30 is directly connected, enp0s8
O   192.168.3.132/30 [110/10] is directly connected, enp0s9, 00:08:26
C>* 192.168.3.132/30 is directly connected, enp0s9
BGP Configuration
There are two parts to the BGP configuration - again, this is quite similar to the Cisco style, though there are a couple of differences.
interface enp0s10
 description ethernet3 - BGP Peering
 ip address 172.16.1.1/24
router bgp 65001
 bgp router-id 192.168.3.134
 network 192.168.0.0/22
 neighbor 172.16.1.3 remote-as 65002
!
router ospf
 redistribute bgp
!
ip route 192.168.0.0/22 Null0
BGP show commands are very similar:
buntu# show ip bgp sum BGP router identifier 192.168.3.134, local AS number 65001 RIB entries 5, using 560 bytes of memory Peers 1, using 4568 bytes of memory
Neighbor        V         AS MsgRcvd MsgSent   TblVer  InQ OutQ Up/Down  State/PfxRcd
172.16.1.3      4 65002      10      10        0    0    0 00:06:06        2

Total number of neighbors 1
ubuntu# show ip bgp
BGP table version is 0, local router ID is 192.168.3.134
Status codes: s suppressed, d damped, h history, * valid, > best, = multipath,
              i internal, r RIB-failure, S Stale, R Removed
Origin codes: i - IGP, e - EGP, ? - incomplete

   Network          Next Hop            Metric LocPrf Weight Path
*> 172.16.2.0/24    172.16.1.3               0             0 65002 i
*> 172.16.3.3/32    172.16.1.3               0             0 65002 i
*> 192.168.0.0/22   0.0.0.0                  0         32768 i

Total number of prefixes 3
ubuntu# show ip bgp nei 172.16.1.3 routes
BGP table version is 0, local router ID is 192.168.3.134
Status codes: s suppressed, d damped, h history, * valid, > best, = multipath,
              i internal, r RIB-failure, S Stale, R Removed
Origin codes: i - IGP, e - EGP, ? - incomplete

   Network          Next Hop            Metric LocPrf Weight Path
*> 172.16.2.0/24    172.16.1.3               0             0 65002 i
*> 172.16.3.3/32    172.16.1.3               0             0 65002 i

Total number of prefixes 2
ubuntu# show ip bgp nei 172.16.1.3
BGP neighbor is 172.16.1.3, remote AS 65002, local AS 65001, external link
  BGP version 4, remote router ID 172.16.3.3
  BGP state = Established, up for 00:06:38
  Last read 00:00:45, hold time is 180, keepalive interval is 60 seconds
  Neighbor capabilities:
    4 Byte AS: advertised
    Route refresh: advertised and received(old & new)
    Address family IPv4 Unicast: advertised and received
    Graceful Restart Capabilty: advertised
  Message statistics:
    Inq depth is 0
    Outq depth is 0
                         Sent       Rcvd
    Opens:                  1          1
    Notifications:          0          0
    Updates:                1          1
    Keepalives:             8          8
    Route Refresh:          0          0
    Capability:             0          0
    Total:                 10         10
  Minimum time between advertisement runs is 30 seconds

 For address family: IPv4 Unicast
  Community attribute sent to this neighbor(both)
  2 accepted prefixes

  Connections established 1; dropped 0
  Last reset never
Local host: 172.16.1.1, Local port: 53632
Foreign host: 172.16.1.3, Foreign port: 179
Nexthop: 172.16.1.1
Nexthop global: fe80::a00:27ff:fe11:9481
Nexthop local: ::
BGP connection: non shared network
Read thread: on  Write thread: off
And finally we can see that host3 can reach host1 and host2:
thomas@ubuntu:~$ ping -c 5 192.168.1.10
PING 192.168.1.10 (192.168.1.10) 56(84) bytes of data.
64 bytes from 192.168.1.10: icmp_seq=1 ttl=61 time=79.2 ms
64 bytes from 192.168.1.10: icmp_seq=2 ttl=61 time=67.3 ms
64 bytes from 192.168.1.10: icmp_seq=3 ttl=61 time=77.6 ms
64 bytes from 192.168.1.10: icmp_seq=4 ttl=61 time=74.6 ms
64 bytes from 192.168.1.10: icmp_seq=5 ttl=61 time=80.1 ms

--- 192.168.1.10 ping statistics ---
5 packets transmitted, 5 received, 0% packet loss, time 4007ms
rtt min/avg/max/mdev = 67.353/75.798/80.153/4.638 ms
thomas@ubuntu:~$ ping -c 5 192.168.2.10
PING 192.168.2.10 (192.168.2.10) 56(84) bytes of data.
64 bytes from 192.168.2.10: icmp_seq=1 ttl=61 time=35.2 ms
64 bytes from 192.168.2.10: icmp_seq=2 ttl=61 time=43.2 ms
64 bytes from 192.168.2.10: icmp_seq=3 ttl=61 time=72.3 ms
64 bytes from 192.168.2.10: icmp_seq=4 ttl=61 time=106 ms
64 bytes from 192.168.2.10: icmp_seq=5 ttl=61 time=78.3 ms

--- 192.168.2.10 ping statistics ---
5 packets transmitted, 5 received, 0% packet loss, time 4006ms
rtt min/avg/max/mdev = 35.266/67.233/106.897/25.761 ms
thomas@ubuntu:~$ traceroute 192.168.1.10
traceroute to 192.168.1.10 (192.168.1.10), 30 hops max, 60 byte packets
 1  172.16.2.1 (172.16.2.1)  9.355 ms  9.164 ms  8.881 ms
 2  172.16.1.1 (172.16.1.1)  20.742 ms  33.116 ms  32.974 ms
 3  192.168.3.129 (192.168.3.129)  32.824 ms  43.471 ms  54.863 ms
 4  192.168.1.10 (192.168.1.10)  65.912 ms  76.476 ms  87.405 ms
So we now have a fully connected network using Quagga where BGP and OSPF is required to enable the connectivity between all the devices.
Conclusions
Hopefully that was useful for some of you. If you have any feedback, please email me at thomasb@gmail.com - I’d love to hear from you.